2024. 3. 2. 11:52ㆍSpring Boot
우선 기본 설정으로
@EnableAsync를 붙여줘야 한다
import org.springframework.batch.core.configuration.annotation.EnableBatchProcessing;
import org.springframework.boot.SpringApplication;
import org.springframework.boot.autoconfigure.SpringBootApplication;
import org.springframework.scheduling.annotation.EnableAsync;

@SpringBootApplication
@EnableAsync
public class DemoApplication {

	public static void main(String[] args) {
		SpringApplication.run(DemoApplication.class, args);
	}
}
그후 원하는 메소드에
@Async 어노테이션을 붙이면 쉽게 구현 할 수 있다.
import java.util.concurrent.Future;

import org.springframework.scheduling.annotation.Async;
import org.springframework.stereotype.Service;

import lombok.extern.slf4j.Slf4j;

@Service
@Slf4j
public class async_service {

    static int num = 0;
    @Async
    void test_async() throws InterruptedException {
        Thread.sleep(100);
        log.info("test_async");
        num += 1;
    }

    void test_sync() throws InterruptedException {
        Thread.sleep(100);
        log.info("test_sync");
        num += 1;
    }

    void set_num() {
        num = 0;
    }

    int get_num() {
        return num;
    }
}
num에 1을 더하는 메소드를 동기화와 비동기화 상황일 때 비교해 보겠다
package com.example.demo.async;
import org.springframework.beans.factory.annotation.Autowired;
import org.springframework.web.bind.annotation.GetMapping;
import org.springframework.web.bind.annotation.RestController;
import lombok.extern.slf4j.Slf4j;
import org.springframework.web.bind.annotation.RequestMapping;
import org.springframework.web.bind.annotation.RequestParam;
@RestController
@RequestMapping("/async")
@Slf4j
public class async_controller {
@Autowired
async_service service;
@GetMapping("/test1")
public StringBuffer test1() throws InterruptedException {
StringBuffer buf = new StringBuffer();
service.set_num();
long before = System.currentTimeMillis();
for(int i = 0; i < 10; i++) {
log.info("test1");
service.test_async();
buf.append(service.get_num());
buf.append(' ');
}
long after = System.currentTimeMillis();
buf.append(" time: ");
buf.append(after - before);
return buf;
}
@GetMapping("/test2")
public StringBuffer test2() throws InterruptedException {
StringBuffer buf = new StringBuffer();
long before = System.currentTimeMillis();
//service.set_num();
for(int i = 0; i < 10; i++) {
log.info("test2");
service.test_sync();
buf.append(service.get_num());
buf.append(' ');
}
long after = System.currentTimeMillis();
buf.append(" time: ");
buf.append(after - before);
return buf;
}
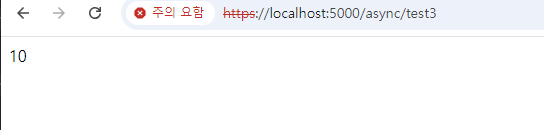
@GetMapping("/test3")
public StringBuffer test3() {
StringBuffer buf = new StringBuffer();
buf.append(service.get_num());
return buf;
}
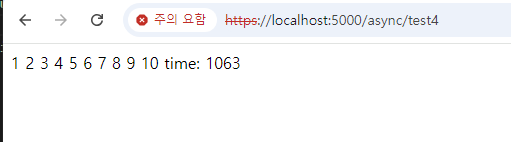
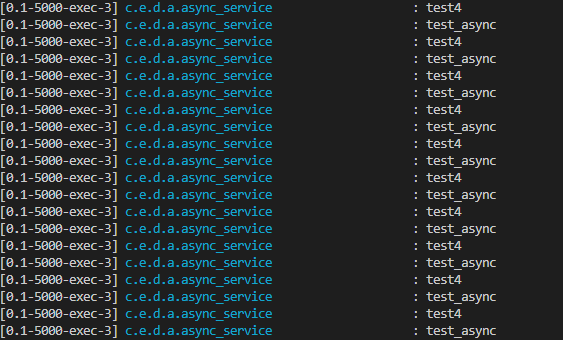
@GetMapping("/test4")
public StringBuffer test4() throws InterruptedException {
return service.test_async2();
}
}

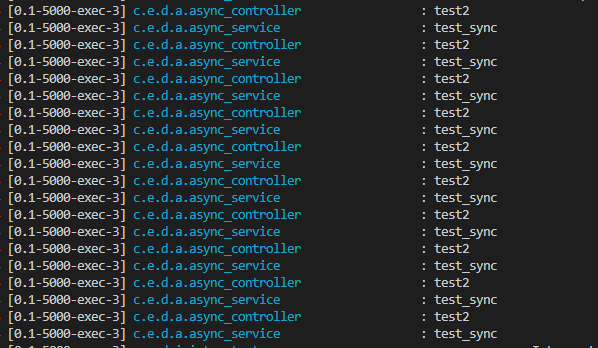
@Async가 없는 동기화 메소드는
한 쓰레드에서 계속 계속 작업이 진행되고 있으므로
숫자값이 올라가고 문자열에 추가되는 과정이 순차적으로 진행되고
중간의 Thread.sleep()이 끝나기 전에 다음 과정이 진행되지 않기 때문에
문자열의 값이 늘 같고 결과 값은 10이고 시간이 오래 걸린다


하지만 비동기화 메소드를 부르는 경우에는
같은 쓰레드가 작업을 진행하는 것이 아니라
다른 쓰레드에 작업을 맡기고 기존 쓰레드는 작업을 계속 진행한다
그래서 메소드가 진행되서 값이 올라가는 걸 기다리지 않고
바로 값을 추가하고 메소드를 불리기 때문에 결과적으로는 값이 10이 되지만
작업 순서는 보장하지 못한다.
또한 AOP를 이용한 것이기 때문에 같은 class에 있는 @Async 메소드를 부르더라도 동기적으로 진행 된다.
이번에는 DB와 IO 작업을 하는 예제를 보이겠다
@Async
    public void create_data1(String data) {
        repo.save(new async_entity(data));
    }

    public void create_data2(String data) {
        repo.save(new async_entity(data));
    }
MySQL에 간단한 데이터를 처리하는 메소드를 동기화와 비동기화로 나누어서 만들고
@SpringBootTest
public class dbServiceTest {

    @Autowired
    async_db_service service;
    @Test
    void testCreate_data1() {
        for(int i = 0; i < 10000; i++) {
            service.create_data1(Integer.toString(i));
        }
    }

    @Test
    void testCreate_data2() {

        for(int i = 0; i < 10000; i++) {
            service.create_data2(Integer.toString(i));
        }
    }
}
각각 1만번 실행하는 테스트를 진행하였다
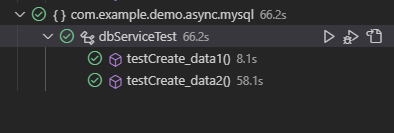
결과는 보다싶이 비동기화 쪽이 훨씬 빠르다
이는 동기화쪽은 한 작업이 끝나면 다른 작업이 시작되는데 반하여
비동기화는 한 작업이 실행중이더라도 다른 쓰레드에서 작업을 실행해서
여러작업이 한꺼번에 실행되기 때문이다.
즉 빠른 처리가 필요하고 중간에 다른 작업의 순서가 중요하지 않은 경우
비동기화 메소드를 이용하면 성능 향상을 꾀할 수 있다.
'Spring Boot' 카테고리의 다른 글
| Spring WebFlux (0) | 2024.03.18 |
|---|---|
| Spring WebClient (0) | 2024.03.10 |
| Spring Boot Studying (0) | 2024.02.28 |
| Authorization by Spring Security (0) | 2024.02.28 |
| Jpa 순환 참조 N + 1 문제 (0) | 2024.02.27 |